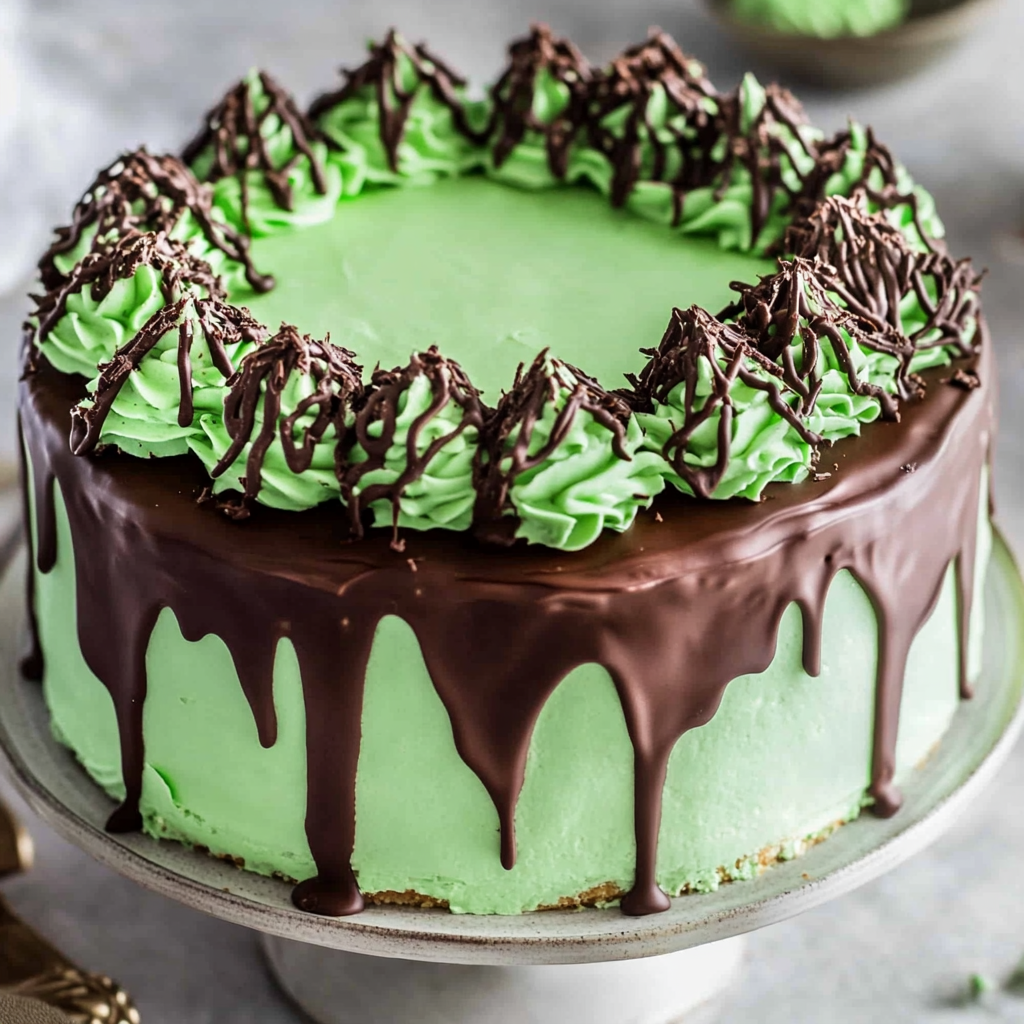
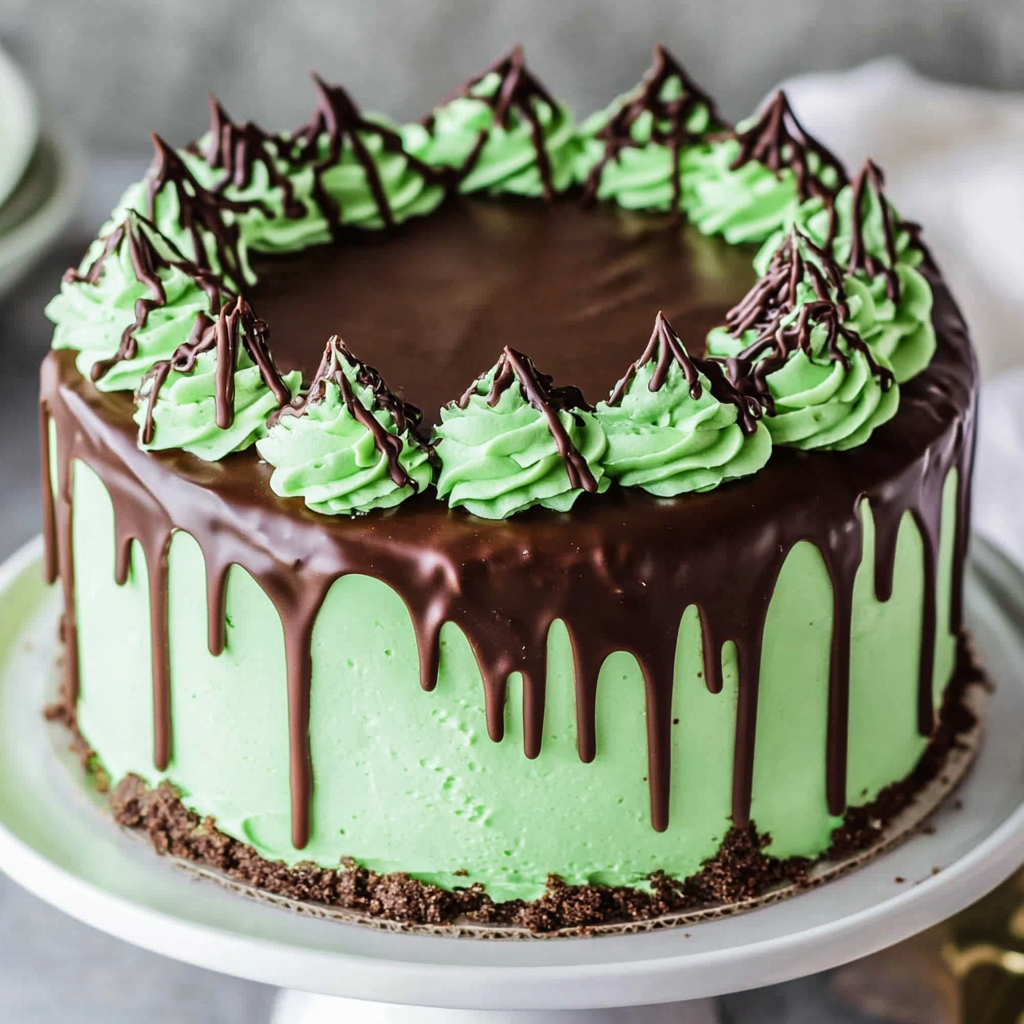
Chocolate Mint Cake
If you’re looking for a dessert that combines the rich flavors of chocolate with a refreshing mint twist, then you’re in for a treat! This Chocolate Mint Cake is a personal favorite of mine, and it always brings back fond memories of family gatherings. Every bite reminds me of mint chocolate chip ice cream—a classic flavor that never goes out of style. Whether you’re celebrating a special occasion or simply want to indulge your sweet tooth on a busy weeknight, this cake is sure to impress everyone at the table.
The best part? It’s surprisingly easy to make! With its soft layers filled with Andes mints and topped with creamy mint chocolate chip frosting, this cake is both delightful and delicious. It’s perfect for birthdays, holidays, or just because you deserve a slice of something sweet!
Why You’ll Love This Recipe
- Irresistible Flavor: The combination of rich chocolate and refreshing mint will have your taste buds dancing.
- Easy to Prepare: Even if you’re not an experienced baker, the clear steps will guide you through with ease.
- Family-Friendly: Kids and adults alike will love this cake—it’s a guaranteed crowd-pleaser!
- Make-Ahead Option: Bake the layers in advance and frost them when you’re ready to serve; it’s perfect for busy days.
- Beautiful Presentation: The vibrant colors and layers make it not just tasty but also visually stunning!
Ingredients You’ll Need
Gathering the right ingredients is key to making this Chocolate Mint Cake shine. Don’t worry; they are all simple, wholesome items that you can easily find at your local grocery store. Here’s what you’ll need:
For the Cake
- 2 1/2 cups All-purpose flour
- 1 cup Dutch process cocoa powder
- 1 3/4 cup White granulated sugar
- 2 1/2 tsp Baking powder
- 1 1/2 tsp Baking soda
- 1 tsp Salt
- 3/4 cup Oil (canola or vegetable)
- 2 tsp Pure vanilla extract
- 4 Large eggs (room temperature)
- 1 1/4 cup Buttermilk (room temperature)
- 1 cup Hot water
For the Frosting
- 2 1/2 cups Unsalted butter (slightly cold)
- 7 1/2 cups Powdered sugar
- 1 tsp Peppermint extract
- 1 tsp Pure vanilla extract
- 1/2 tsp Salt
- 1/2 cup Heavy cream
- Food dye (blue, green, brown)
For Decoration
- 4 oz Semisweet chocolate bar (chopped into small pieces)
- 2 Packages of Andes Mints (40 bars for filling, rest for decoration)
Variations
This Chocolate Mint Cake is wonderfully versatile! Here are some fun ideas to mix things up:
- Add Nuts: If you enjoy a bit of crunch, toss in some chopped walnuts or pecans into the batter.
- Try Different Fillings: Swap Andes mints for other chocolate candies like York peppermint patties for a different flavor profile.
- Change Up the Frosting: Consider using whipped cream frosting instead of mint chocolate chip frosting for a lighter touch.
- Make It Gluten-Free: Substitute all-purpose flour with a gluten-free blend to accommodate dietary needs.
How to Make Chocolate Mint Cake
Step 1: Prepare Your Cake Pans
Start by preheating your oven to 350°F (175°C). Grease and flour two round cake pans. This step ensures that your cakes will release easily after baking.
Step 2: Mix Dry Ingredients
In a large bowl, whisk together the all-purpose flour, cocoa powder, baking powder, baking soda, and salt. This helps evenly distribute the leavening agents throughout the flour so your cake rises beautifully.
Step 3: Combine Wet Ingredients
In another bowl, mix together the oil, vanilla extract, eggs, buttermilk, and hot water. Mixing wet ingredients separately allows them to blend smoothly before combining with dry ingredients.
Step 4: Combine Dry and Wet Mixtures
Gradually add the wet mixture to the dry ingredients. Stir until just combined—don’t overmix! A few lumps are okay; overmixing can lead to a dense cake.
Step 5: Bake the Cakes
Divide the batter evenly between your prepared pans and bake for about 25 minutes or until a toothpick comes out clean. The aroma will fill your kitchen—trust me; it’s heavenly!
Step 6: Cool Before Frosting
Let the cakes cool in their pans for about ten minutes before transferring them to wire racks. Cooling is vital because frosting warm cakes can cause melting and messiness.
Step 7: Prepare Your Frosting
While your cakes cool down completely, whip up your mint chocolate chip frosting by creaming together unsalted butter with powdered sugar until fluffy. Add peppermint extract and heavy cream until you achieve your desired consistency.
Step 8: Assemble Your Cake
Once cooled, place one layer on a serving plate. Spread half of the frosting on top and layer in chopped Andes mints as filling. Place the second cake layer on top and frost the top and sides generously.
Step 9: Add Final Touches
Decorate your cake with additional Andes mints or drizzle melted semisweet chocolate over the top for an extra special finish!
Enjoy making this delightful Chocolate Mint Cake! It’s bound to bring smiles all around!
Pro Tips for Making Chocolate Mint Cake
Baking is all about confidence and a little guidance, so here are some pro tips to ensure your Chocolate Mint Cake turns out perfectly every time!
- Use room temperature ingredients: When your eggs and buttermilk are at room temperature, they blend more easily into the batter, resulting in an even texture and better rise.
- Measure flour correctly: Spoon the flour into your measuring cup and level it off with a knife instead of scooping directly from the bag. This prevents compacting and gives you the right amount for a light cake.
- Don’t overmix the batter: Mix just until combined to avoid a dense cake. Overmixing can develop gluten, resulting in a tough texture.
- Cool completely before frosting: Allow your cake layers to cool completely on a wire rack before frosting them. This prevents melting and helps maintain the structure of your beautiful layers.
- Chill the frosting: If your mint chocolate chip frosting feels too soft, pop it in the refrigerator for about 15 minutes before spreading it on the cake. This will make it easier to work with and provide a smoother finish.
How to Serve Chocolate Mint Cake
Presenting your Chocolate Mint Cake beautifully can make all the difference. Here are some delightful ideas to elevate your dessert experience!
Garnishes
- Chocolate shavings: A sprinkle of finely chopped or shaved semisweet chocolate on top adds an elegant touch that complements the flavors.
- Fresh mint leaves: Placing a few fresh mint sprigs around the base or on top of the cake not only enhances presentation but also adds a burst of color and fragrance.
- Crushed Andes mints: Scatter some crushed Andes mints over the frosting for an extra minty crunch that guests will love.
Side Dishes
- Vanilla ice cream: The creamy sweetness of vanilla ice cream pairs perfectly with the rich chocolate mint flavor, creating a delightful contrast.
- Fresh fruit salad: A refreshing fruit salad made with seasonal fruits adds brightness and balances out the richness of the cake.
- Whipped coconut cream: Light and fluffy whipped coconut cream can be a delicious dairy-free alternative that complements the cake without overpowering it.
- Coffee or herbal tea: A warm cup of coffee or soothing herbal tea makes for a comforting beverage pairing that enhances the overall dessert experience.
Enjoy baking this delightful Chocolate Mint Cake, and don’t forget to share it with friends and family! Happy baking!
Make Ahead and Storage
This Chocolate Mint Cake is perfect for meal prep, allowing you to enjoy delightful slices over several days. With its rich flavors and creamy frosting, it’s a great dessert to make in advance!
Storing Leftovers
- Keep the cake in an airtight container at room temperature for up to 3 days.
- For longer freshness, refrigerate the cake for up to a week.
- If you have leftover frosting, store it in a separate container in the fridge for up to 1 week.
Freezing
- Wrap individual slices of the cake tightly in plastic wrap and then in aluminum foil.
- Freeze for up to 3 months.
- To freeze the entire cake, ensure it is completely cooled before wrapping, and follow the same wrapping instructions.
Reheating
- To enjoy a slice warm, microwave it for about 10-15 seconds.
- If thawing a frozen slice, let it sit at room temperature for about an hour before microwaving.
- Avoid reheating the entire frosted cake as it may affect the texture of the frosting.
FAQs
Here are some common questions about making this delicious Chocolate Mint Cake:
Can I use regular cocoa powder instead of Dutch process cocoa powder for Chocolate Mint Cake?
Yes! You can substitute regular cocoa powder if necessary; however, it may slightly alter the flavor and color of your cake.
How can I make my Chocolate Mint Cake more minty?
To enhance the mint flavor in your Chocolate Mint Cake, consider adding extra peppermint extract or using crushed Andes mints mixed into both the batter and frosting.
Is this Chocolate Mint Cake suitable for special occasions?
Absolutely! This cake’s stunning layers and delightful flavors make it perfect for birthdays, holidays, or any celebration.
Can I use a different type of chocolate instead of semisweet chocolate?
Certainly! You can experiment with dark chocolate or milk chocolate based on your preference.
Final Thoughts
I hope you find this Chocolate Mint Cake as delightful as I do! With its soft layers and refreshing minty frosting, it’s sure to bring joy to anyone who tries it. Whether you’re celebrating a special occasion or simply treating yourself, this cake is a wonderful choice. Enjoy making it, and I can’t wait to hear how yours turns out!