Halloween Cake Pops
If you’re looking for a fun and festive treat to brighten up your Halloween celebration, you’ve come to the right place! These Halloween Cake Pops are not just delicious; they’re a delightful way to get everyone in the spooky spirit. With their vibrant decorations, these little bites of joy can transform any gathering into a festive affair. Whether it’s a busy weeknight or a family gathering, these cake pops are sure to bring smiles and sweet moments.
What makes this recipe even more special is that it’s super simple to whip up! You can customize your cake pops for various occasions or just because. Let’s dive into why these Halloween Cake Pops will become a favorite in your home!
Why You’ll Love This Recipe
- Easy to make: The step-by-step instructions ensure anyone can craft these treats without stress.
- Family-friendly fun: Kids will love helping decorate their own spooky creations!
- Make-ahead convenience: Prepare them in advance so you can enjoy the party without last-minute stress.
- Deliciously versatile: With different toppings and colors, you can create an assortment of flavors and designs.
- Perfect for sharing: These bite-sized treats are great for parties, potlucks, or simply treating yourself!

Ingredients You’ll Need
Gathering the ingredients for these Halloween Cake Pops is simple and fun! With just a few wholesome items, you’ll be all set for your baking adventure. Here’s what you’ll need:
- 1 box Favorite cake mix
- 1 3.4 oz box instant pudding mix
- 4 eggs
- 1 cup water
- 1/3 cup vegetable oil
- 1 cup Frosting
- Candy Melts
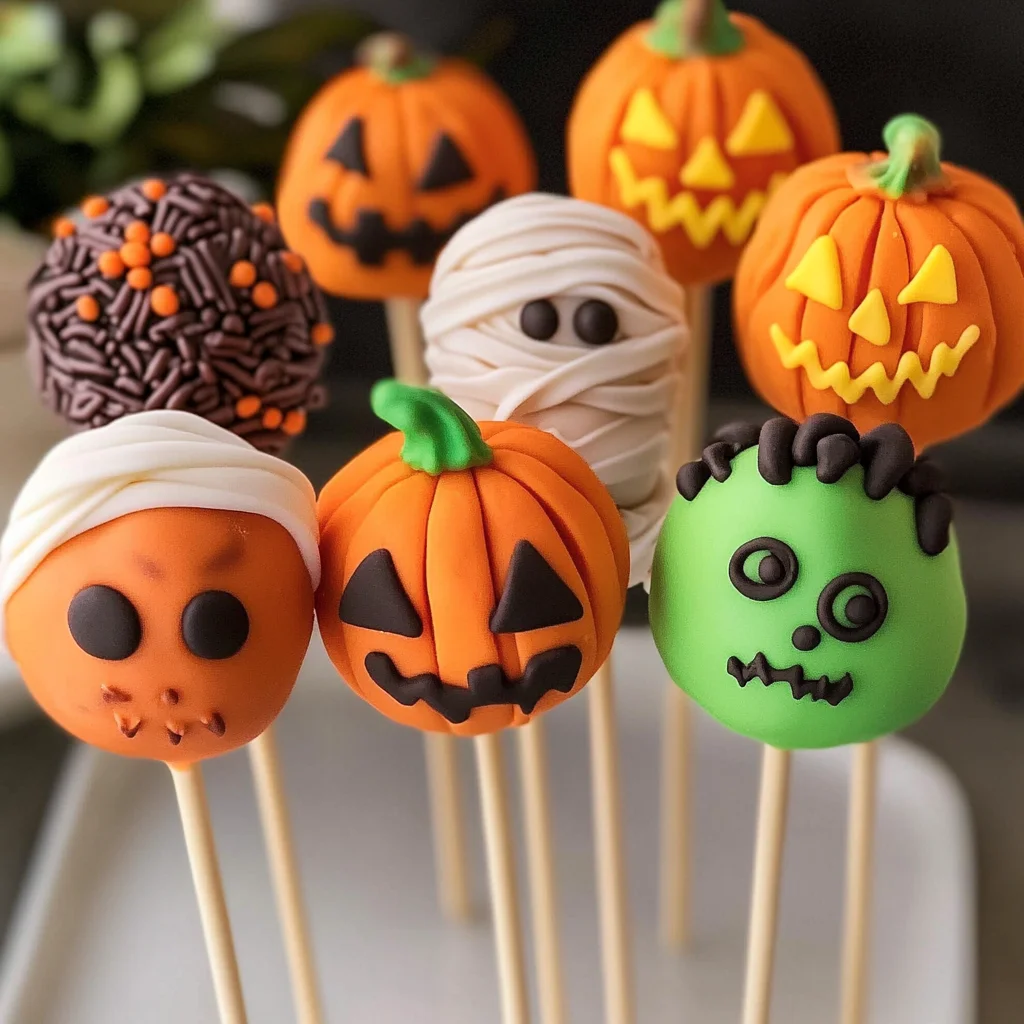
- Toppings – sprinkles, candy eyes
Variations
One of the best parts about making Halloween Cake Pops is how flexible this recipe is! Feel free to get creative with flavors and decorations that suit your taste.
- Change up the flavor: Use chocolate cake mix instead of vanilla for a rich twist.
- Add spices: Incorporate pumpkin spice or cinnamon into the batter for an autumnal flair.
- Switch the frosting: Try cream cheese frosting or a flavored variety for unique tastes.
- Experiment with toppings: Use crushed cookies or colorful candies to create different looks.
How to Make Halloween Cake Pops
Step 1: Preheat Your Oven
Start by preheating your oven to 350°F (175°C). This step is crucial as it ensures your cake bakes evenly and rises perfectly. While that’s warming up, spray your 13 x 9 pan with vegetable pan spray so that your cake releases easily later.
Step 2: Mix the Batter
In a large bowl, combine the cake mix, pudding mix, eggs, water, and oil. Beat at medium speed for about 2 minutes until everything is well blended. Pour this mixture into your prepared cake pan and get ready for some delicious baking!
Step 3: Bake It Up!
Bake in your preheated oven for 30-40 minutes. Check with a toothpick inserted in the center; when it comes out clean, it’s done! Once baked, let it cool in the pan for about 10 minutes before transferring it to a wire rack.
Step 4: Crumble It Down
Once cooled, it’s time to crumble the cake! In a large bowl, use your hands or two forks to break it into fine crumbs. This step is essential as it forms the base of our cake pops.
Step 5: Add Frosting
Now comes the fun part—adding frosting! Mix in the frosting with your fingers until everything is well combined. The mixture should be moist enough to hold together but not overly sticky.
Step 6: Shape Into Balls
Form small balls from the mixture using your hands. Aim for about one inch in diameter; this size makes them easy to eat and perfect for dipping!
Step 7: Chill Out
Pop those cake balls into the refrigerator for at least two hours. Chilling helps them firm up so they won’t fall apart when dipped in chocolate later.
Step 8: Melt Your Candy Melts
While waiting, melt your Candy Melts in short bursts in the microwave (30 seconds at half power), stirring each time until smooth. This melting process creates a lovely coating for our pops.
Step 9: Insert Sticks
Dip one end of each stick into melted Candy Melts before inserting it into each chilled cake ball. This helps secure them together while setting. You can also place them in the freezer briefly if you’re short on time!
Step 10: Dip Your Pops
Once set, dip each pop fully into the melted Candy Melts until covered completely. Let any excess drip off before moving on to decoration!
Step 11: Decorate!
Finally, sprinkle on your selected toppings like sprinkles or candy eyes while the coating is still wet. Get creative! Each pop can have its unique character!
And there you have it—spooky and scrumptious Halloween Cake Pops ready to impress at any gathering! Enjoy making them as much as you’ll enjoy eating them!
Pro Tips for Making Halloween Cake Pops
Creating the perfect Halloween cake pops can be a delightful experience, and a few expert tips can make all the difference!
- Use quality ingredients: Opting for high-quality cake mix and frosting not only enhances flavor but also improves texture, giving your cake pops a more decadent taste.
- Chill the cake balls: Allowing your formed cake balls to chill in the refrigerator for at least 2 hours ensures they hold their shape during dipping. This step prevents any mishaps when inserting the sticks or coating them with candy melts.
- Melt Candy Melts properly: Melting your candy melts in short intervals prevents overheating, which can cause them to seize up. Stirring after each interval helps achieve that smooth, luscious consistency needed for dipping.
- Experiment with decoration: Don’t shy away from being creative! Use various toppings such as crushed cookies, edible glitter, or themed sprinkles to give each pop a unique look that fits your Halloween theme.
- Store correctly: Keep your decorated cake pops in an airtight container at room temperature for up to a week. This ensures they stay fresh and delicious for your Halloween festivities!
How to Serve Halloween Cake Pops
Presenting your spooky treats is just as important as making them! Here are some fun ideas on how to showcase your Halloween cake pops to impress your guests.
Garnishes
- Whipped Cream: A dollop of fluffy whipped cream adds a delightful creaminess that complements the sweetness of the cake pops.
- Chocolate Drizzle: Drizzling some melted chocolate over your pops gives an elegant touch while adding another layer of flavor.
Side Dishes
- Pumpkin Spice Cookies: These soft cookies are infused with warm spices that echo classic fall flavors and pair beautifully with the sweetness of cake pops.
- Candy Corn Trail Mix: A fun mix of candy corn, nuts, and dried fruits creates a crunchy side that contrasts nicely with the soft texture of the cake pops.
- Apple Slices with Caramel Dip: Fresh apple slices drizzled with caramel provide a refreshing balance to the rich sweetness of cake pops, making for a lovely pairing at any gathering.
- Mini Pumpkin Pies: These bite-sized treats are perfect for fall and will add an adorable touch alongside your Halloween cake pops on any dessert table.
By combining these serving suggestions with your delicious Halloween Cake Pops, you’ll create an unforgettable treat experience that everyone will enjoy! Happy baking!
Make Ahead and Storage
These Halloween Cake Pops are perfect for meal prep and can be made ahead of time, making your party planning a breeze! Here’s how to store and preserve their deliciousness.
Storing Leftovers
- Keep any leftover cake pops in an airtight container at room temperature for up to 3 days.
- If you want to maintain their freshness longer, store them in the refrigerator for up to a week.
Freezing
- To freeze, place the cake pops in a single layer on a baking sheet and freeze until firm.
- Once frozen, transfer them to an airtight container or freezer bag. They can last for up to 3 months in the freezer.
Reheating
- If you’ve stored your cake pops in the fridge, let them sit at room temperature for about 30 minutes before serving.
- For frozen pops, thaw them overnight in the refrigerator before enjoying.
FAQs
Here are some common questions about making Halloween Cake Pops that might help you out!
How do I make Halloween Cake Pops?
To make Halloween Cake Pops, start by baking your favorite cake mix as per the instructions. Once baked and cooled, crumble it up, mix with frosting, form into balls, chill, and dip in melted Candy Melts. Decorate with sprinkles or candy eyes for a spooky touch!
Can I customize my Halloween Cake Pops?
Absolutely! You can use different cake flavors or add food coloring to your Candy Melts. Feel free to get creative with decorations—try using various toppings like nuts or themed sprinkles to match your Halloween party theme!
How long do Halloween Cake Pops last?
Halloween Cake Pops can be stored at room temperature for up to 3 days or refrigerated for up to a week. If you freeze them, they can last for up to 3 months!
What toppings can I use for Halloween Cake Pops?
You can use a variety of toppings such as sprinkles, crushed candy bars, edible glitter, and candy eyes! Get creative with your decorations to make each pop unique.
Final Thoughts
I hope this recipe brings you joy during the spooky season! These Halloween Cake Pops are not just treats; they’re little bundles of fun that everyone will love. So gather your ingredients and let your creativity shine as you decorate these delightful bites. Enjoy every moment of making them—I can’t wait for you to try it out!